Category Archives: Cooking

Sriracha & Potato Stir-Fry

So, we were experimenting with stir-fry composition, and happened upon a new favourite: Sriracha & (Rosemary) Potato.

It goes as follows:

Total preparation and cooking time: 25-30 mins.
Serves 2.

Recommended music: https://www.youtube.com/watch?v=UkSr9Lw5Gm8
(Because cooking is very much like building things.)

Equipment required:
– Some sort of stove
– Some sort of frying pan
– Some sort of stirring/spatuling instrument

Ingredients required:
– Some sort of cooking oil (we’ve been using grape oil, which is actually super-tasty)
– Two medium potatoes
– One medium onion (I prefer yellow) or 1/2 bunch of green onion
– Three half peppers
– Two cloves of garlic
– Sriracha sauce
– Some sort of soy sauce (we used Kikkoman low sodium)
– Rosemary (cf. Rosemary Potatoes)
– Some sort of herbs/spices (we used Oregano & Basil)

Pairs well with rice & greek salad, as seen here:

The delicious stirfry from today:

Directions:
– Turn on the stove to medium-low (I do 3/10 on our stove’s large burner, with both parts of the burner turned on)

– Thin-slice the potatoes, and cut these slices in four (I cut the potatoes in half, cut them into thin slices, and then put the pile on the cutting board, and cut again in four.)
– Add the potatoes and some cooking oil to the frying pan.
– You are going to want to stir on a regular basis. Potatoes are frying pan-sticky
– If you’re using a medium/cooking onion (not green onion), chop up the medium onion and add it to the frying pan. (I top and tail the onion, remove the outer layer or two, then slice it, then chop the stack of slices in four or six. I usually rinse the onion before chopping, but that was not enough to protect me today.)
– Chop up the garlic and add it to the mix (I do garlic the same way I do onions, top & tail ,then remove outer layer, and then slice, then cut stack of slices in two or four.)
– You may need or want to add a little more cooking oil, to prevent burning or sticking.
– This is a good time to add the herbs (rosemary is the most important), and the sriracha & soy sauce. For the sriracha, enough to go back and forth in the frying pan a few times, and perhaps 3-5 splashes of soy sauce.
– Chop up the peppers (I chop three in half, so I can get red/orange/yellow, and save the other halves for tomorrow’s meal). I wash them, remove the tops, rinse them, cut them in half, remove the bottom center part, then slice and then dice them. Throw them into the mix.
– You’re still stirring, right?
– Keep stirring until the potatoes are soft enough that you want to eat them. Total elapsed time was about 30 mins today. (Total time yesterday was about 25 mins at a stove setting of 4/10, but I was worried about burning the mix throughout the entire process.)

Serves 2.

Baba’s Cabbage Rolls

'Traditional Ukranian Cookery' cookbook

When I was about one year old, my family briefly moved to Ottawa. This turned out to be lucky, as it meant that my Baba wrote down all her recipes for my mom to take with her. This is my favourite, her amazing Cabbage Rolls, in her words:

Cabbage Rolls

Baba's famous Cabbage Rolls, page one
Baba’s famous Cabbage Rolls, page one


Parboil about 1 cup of rice and 3 cups or so of boiling water so you wouldn’t have any water to drain. Let it go dry but not burn. You have to guess.

I cook some onions chopped and celery if I have it and minced[1] meat any kind pork or beef or chopped ham anything you have around. Mix it with rice and season with salt , pepper, and sage & mace if you have it.

Scald leaves of Cabbage, but don’t boil; they will tear. Take a spoonful of rice and roll it tight. Put with end down.

Baba's famous Cabbage Rolls, page two
Baba’s famous Cabbage Rolls, page two


If you cook on top of stove, use a wire piece you have on bottom of pot[2] then lay your Cabbage rolls on top. Put some tomato juice mixed with little water and pour over Cabbage rolls . Don’t fill the pot too full, about a little over a half or near 3/4 full. You can use cans of tomato sauce diluted with water or dilute ketchup with water. Cook on low heat. After they start cooking, you can cover with chili sauce or spicy relish if you like them spicy. In roasting pan you don’t need the wire.

It takes about an hour or longer in pot, and a little [sic][3] in Roasting pan, or try one, taste it, if it’s cooked, it saves heat cooking on top of stove[4].

Before transcribing this, I didn’t know what ‘Parboiling‘ was. Cool.

(All punctuation mine.)

[1]Having eaten these cabbage rolls many years ago, I OCR[5]’d these words to ‘you need’, as the meat makes a large part of the flavour (I remember hot dog bits being especially tasty). Looking at it again, I’m pretty sure it says ‘minced’ instead. Either works, as long as the meat is in small pieces. 😀

[2]I’m assuming this means some sort of pot insert, but I’ll have to test to find out.

[3]Here, I’m assuming it should read ‘a little longer’, but I’ll have to try cooking them to find out.

[4]I think this either means it saves heat to cook the Cabbage Rolls on top of the stove instead of in the oven, or (more likely) it means that once they’re cooked, you can just keep them warm on top of the stove, which saves heat.

[5]With my eyes.

Sensory Fruit

Warning: Fart Jokes and possibly worse.

If beans are the ‘musical fruit’, what is the ‘visually artistic fruit’? And are there fruits for the other senses?

The ‘Miracle Fruit’ (Synsepalum dulcificum) is known to interact with taste buds to make sour foods (such as itself) taste sweet.

D. Spinosa‘ is purported to induce visions, either from tea made from its leaves, or from its berries.

For fruit which will change your sense of smell, one needs look no further than horseradish[1]. If you don’t know what I mean, try eating some wasabi[2].

To change your proprioception, try drinking fermented grapes.

The plant Acmella Oleracea is known to cause numbness. Interestingly, it is used as a garnish in salads, as ‘small amounts of shredded fresh leaves are said to add a unique flavour to salads.

Stay tuned for next time, when we discuss plants as if we were horses looking for a snack!

[1]Cultivated by real horses!

[2]Really, don’t. Please.

Fruit & Ice Cream

Fruit and Ice Cream. One of my favourite things in the world. Where does it come from? As far back as I can remember, it’s been one of my favourite treats (especially bananas!). I think it comes from both sides of my family. I have very specific memories of combining Neopolitan[1] ice cream with bananas, I’m sure both with my Baba and Grandma.

Looking at wikipedia, it looks like as far back as Ice Cream has been a thing, Ice Cream and Fruit has been a thing. I suspect that it is because fruit has been a meal/dessert since there has been such a thing, and when Ice Cream came along, it was only natural to try to combine the two.

Personally, I prefer the mix because the sweetness and cream of the Ice Cream cuts the tartness of the fruit. I don’t know exactly what it is about bananas, though. Some really special synergy.

Mmmmmm. 😀

[1]Chocolate, Vanilla, Strawberry, 1/3 each, in blocks. Not sure if it’s called differently in different places.

Fruit Pancakes

When I was growing up, we had a weekend tradition, making fruit pancakes. It was the thing I remember my dad making most often in the kitchen[1].

I also remember helping my mom with baking and other various food prep, but pancakes were the first thing that I learned to make myself, with no recipe.

The recipe is very forgiving, and probably helped me a lot with my nalysnyky.

Fruit Pancakes, 1 batch:

Ingredients:
– 1 overfull cup of Pancake mix (we always used Aunt Jemima buttermilk pancake mix, you can only get it ‘complete’ now, which doesn’t require milk or eggs, but we add them anyway…vegans or those lactose intolerant should see if they can find the non-complete version, or make this part from scratch)
– 2 large eggs (vegans can omit this, but I don’t know how it will work)
– 1 cup milk (vegans or those lactose intolerant can use water here)
– Butter, 1/2 to 1 stick
– Fruit to taste (2 bananas, 2 handfuls of cherries or blueberries, 1/2 can of peaches, some people like apples in pancakes, but I don’t…apples I would peel before use)
– Maple syrup (optional)

Kitchen tools:
– Medium to large mixing bowl
– Stirring spoon
– Ladle (optional)
– Butter knife
– Measuring cup or mug (a normal sized mug is fine…all you need is something that will be the same size each time)
– Skillet

Instructions:
– Turn on your skillet to 375 degrees F. You may need to experiment to figure this out. It should be the temperature where butter will crackle and turn brown (eventually), but not burn
– Crack the eggs into the mixing bowl. Remove any shell that accidentally got in.
– Add the fruit. Cut bananas into 6, then slice, cut peach slices in 3
– Add 1 heaping cup of pancake mix
– Add about half of the cup of milk
– Stir. You’re looking for the lumps to disappear, and to see the popping bubbles from the baking soda and baking powder in the pancake mix
– Stir while adding more of the milk. You will probably end up putting bout 3/4 of the cup in
– Stir until there are no more lumps, and the mix is the correct consistency (the easiest way to test this is by buttering the skillet and putting a pancake on the skillet. It should be about 0.7-1.0cm thick. This part will likely be trial and error.)
– Butter up your skillet! Especially with the first pancakes of a batch, you want to make sure there’s lots of butter on the skillet. I usually cut off a piece with the butter knife, stab[2] the piece, and swab it around the skillet. You want to make sure the pancakes won’t stick, and incidentally also be filled with buttery flavour goodness.
– Pour one half ladle’s worth or three tablespoons’ worth of pancake batter for each pancake you want to make. A large square skillet will hold four pancakes, most frying pans can only hold three or fewer.[3]
– Watch the underside of the pancackes. This is not the easiest thing to do. You want to flip them when they look cooked on the bottom. You can also tell from the top when the top starts to dry out and become pockmarked.
– Flip the pancakes
– Watch them, don’t let them burn
– When the pancakes are cooked on both sides, spatula them onto a serving plate and start the next batch. You will want to at least partially re-butter the skillet
– Serve with syrup or butter, to taste, or eat them plain!

Serves 2-3 per batch. Can be easily multiplied by multiplying all ingredients above. Note that the milk should still be added only until the mix has the correct consistency, or you will get something close to crepes (very thin pancakes) with strange large fruit-shaped lumps.

Enjoy!

[1]I also remember him making toasted meat sandwiches and jam, but I was never really involved in that.

[2]It’s a butter knife.

[3]Advanced: The little spatters of batter are called ‘crunchies and munchies’, and you can make sure to add a bit of extra butter and put little bits of batter in it

Chili Perhaps con Carne

Chili Peeping!
Chili Peeping!

Chili con Carne was the second thing[1] I ever learned to cook (Thanks JC!). I learned to cook it right after I moved out in 2nd year.

This recipe is in the tradition of what my mom (and I’m assuming my Baba) call ‘peasant cooking’. You take the things that you have on hand, and combine them in a way that makes the most sense. Hashes, casseroles, and stir-frys are similar.

This Chili works well with a variety of ingredients. It can be made vegan (and I often do) by not putting in the meat (as described below).

Chili Perhaps con Carne
Feeds about 8, takes about 1 hr

Ingredients:
– Meat if you want (1 lb lean or extra lean ground beef works well, I imagine chicken would also work well, or whatever else you have lying around)
– 2 small- to medium-sized yellow onions, or 1/2 to a full large one
– 1 can whole tomatoes (796 mL, if you don’t like them whole, crushed may work, but I’ve never tried it.)
– 1 can kidney beans (540 mL, some organic kidney beans come in smaller cans. This is fine.)
– 1 can tomato paste (156 mL, the small ones in the grocery store)
– Garlic, 4 cloves (not 4 heads, that would be delicious, but you would probably not taste anything else)
– Herbs & spices (I use oregano, rosemary, black pepper, basil, and sometimes cinnamon)
– Chili powder (actually not a requirement, surprisingly)
– Whatever vegetables you want to put in (peppers work really well, tomatoes could work, but are already present, broccoli may work, cauliflower and potatoes will give a more starchy/sweet taste, zucchini works reasonably well)
– Olive oil (you could use any cooking oil or butter here, even water in a pinch)
– Skillet (Thanks Y&C!), large frying pan, or wok
– Some type of stirring spoon (I use a large wooden spoon)
– Can opener

con Carne Process:
– Turn on the stove. Probably 375 degrees (190 Celsius), for me it’s 3 ticks less than middle on a large burner. 375 is where butter browns, if that’s helpful.
– Cook the meat[2]. For ground beef, this means browning the meat so that it is brown all the way through. I usually put all the meat in the skillet, split it up so more of it is in contact with the cooking surface, then add the olive oil.
– While the meat is cooking, add in the herbs and spices
– While the meat is cooking, chop up the onion(s). I chop them up into about 0.5cm slices, then into 1-2cm max-length bits from that.

Vegan Process:
– Turn on the stove. Probably 375 degrees (190 Celsius), for me it’s 3 ticks less than middle on a large burner. 375 is where butter browns, if that’s helpful.
– Chop up the onions I chop them up into about 0.5cm slices, then into 1-2cm max-length bits from that.
– While the onions are cooking, add in the herbs and spices

Common Process:
– While the onions are cooking, chop up whatever vegetables you’re putting in. I chop up peppers into about 1cm squares
– Throw the vegetables into the mix. Stir them in. Depending on the vegetable, you’ll want to order them by slowest-cooking to fastest-cooking. This is why I put the onions in first. I would put root vegetables (potatoes, carrots especially) in early, mushier vegetables like zucchini in a little later
– Open the can of whole tomatoes. Pour it in including the tomato juice. You will want to split the whole tomatoes in half using the wooden spoon, or they will feel like lava when you try to eat them.
– Open the can of kidney beans (keep the lid). Pour off the water (lid is helpful here). Rinse the kidney beans once or twice and pour off the rinse water (lid is still helpful). Pour the kidney beans into the mix. Stir.
– Open the can of tomato paste. Scrape as much of the tomato paste as you can into the mix (they don’t call it paste for no reason!).
– Stir.
– Let it come to a boil (bubbles popping), then reduce heat somewhat, stirring every few minutes. Let it simmer, with occasional tasting to see it it’s ready. For me, it’s ready when the texture of the vegetables is pleasantly smooth and yielding[3]. This usually takes 10-20mins.

Feeds probably 8.

[1]I’m specifically talking about things I can cook without a recipe. I did a lot of baking with my mom when I was growing up. Or perhaps I did a lot of eating cookie and cake batter. I’m not sure. It was a long time ago.

[2]I only ever start this dish with meat which is already cooked. There is more than enough moisture in the rest of the dish that it is not an issue. I tend to err on the side of caution with ground beef and chicken, as you want to make sure they are well-cooked. I cook them before adding anything else, so I can see that they are cooked.

[3]You may prefer your vegetables ‘al dente’. De gustibus non disputandum est.

Ballroom Blintz

ballroom_blintz

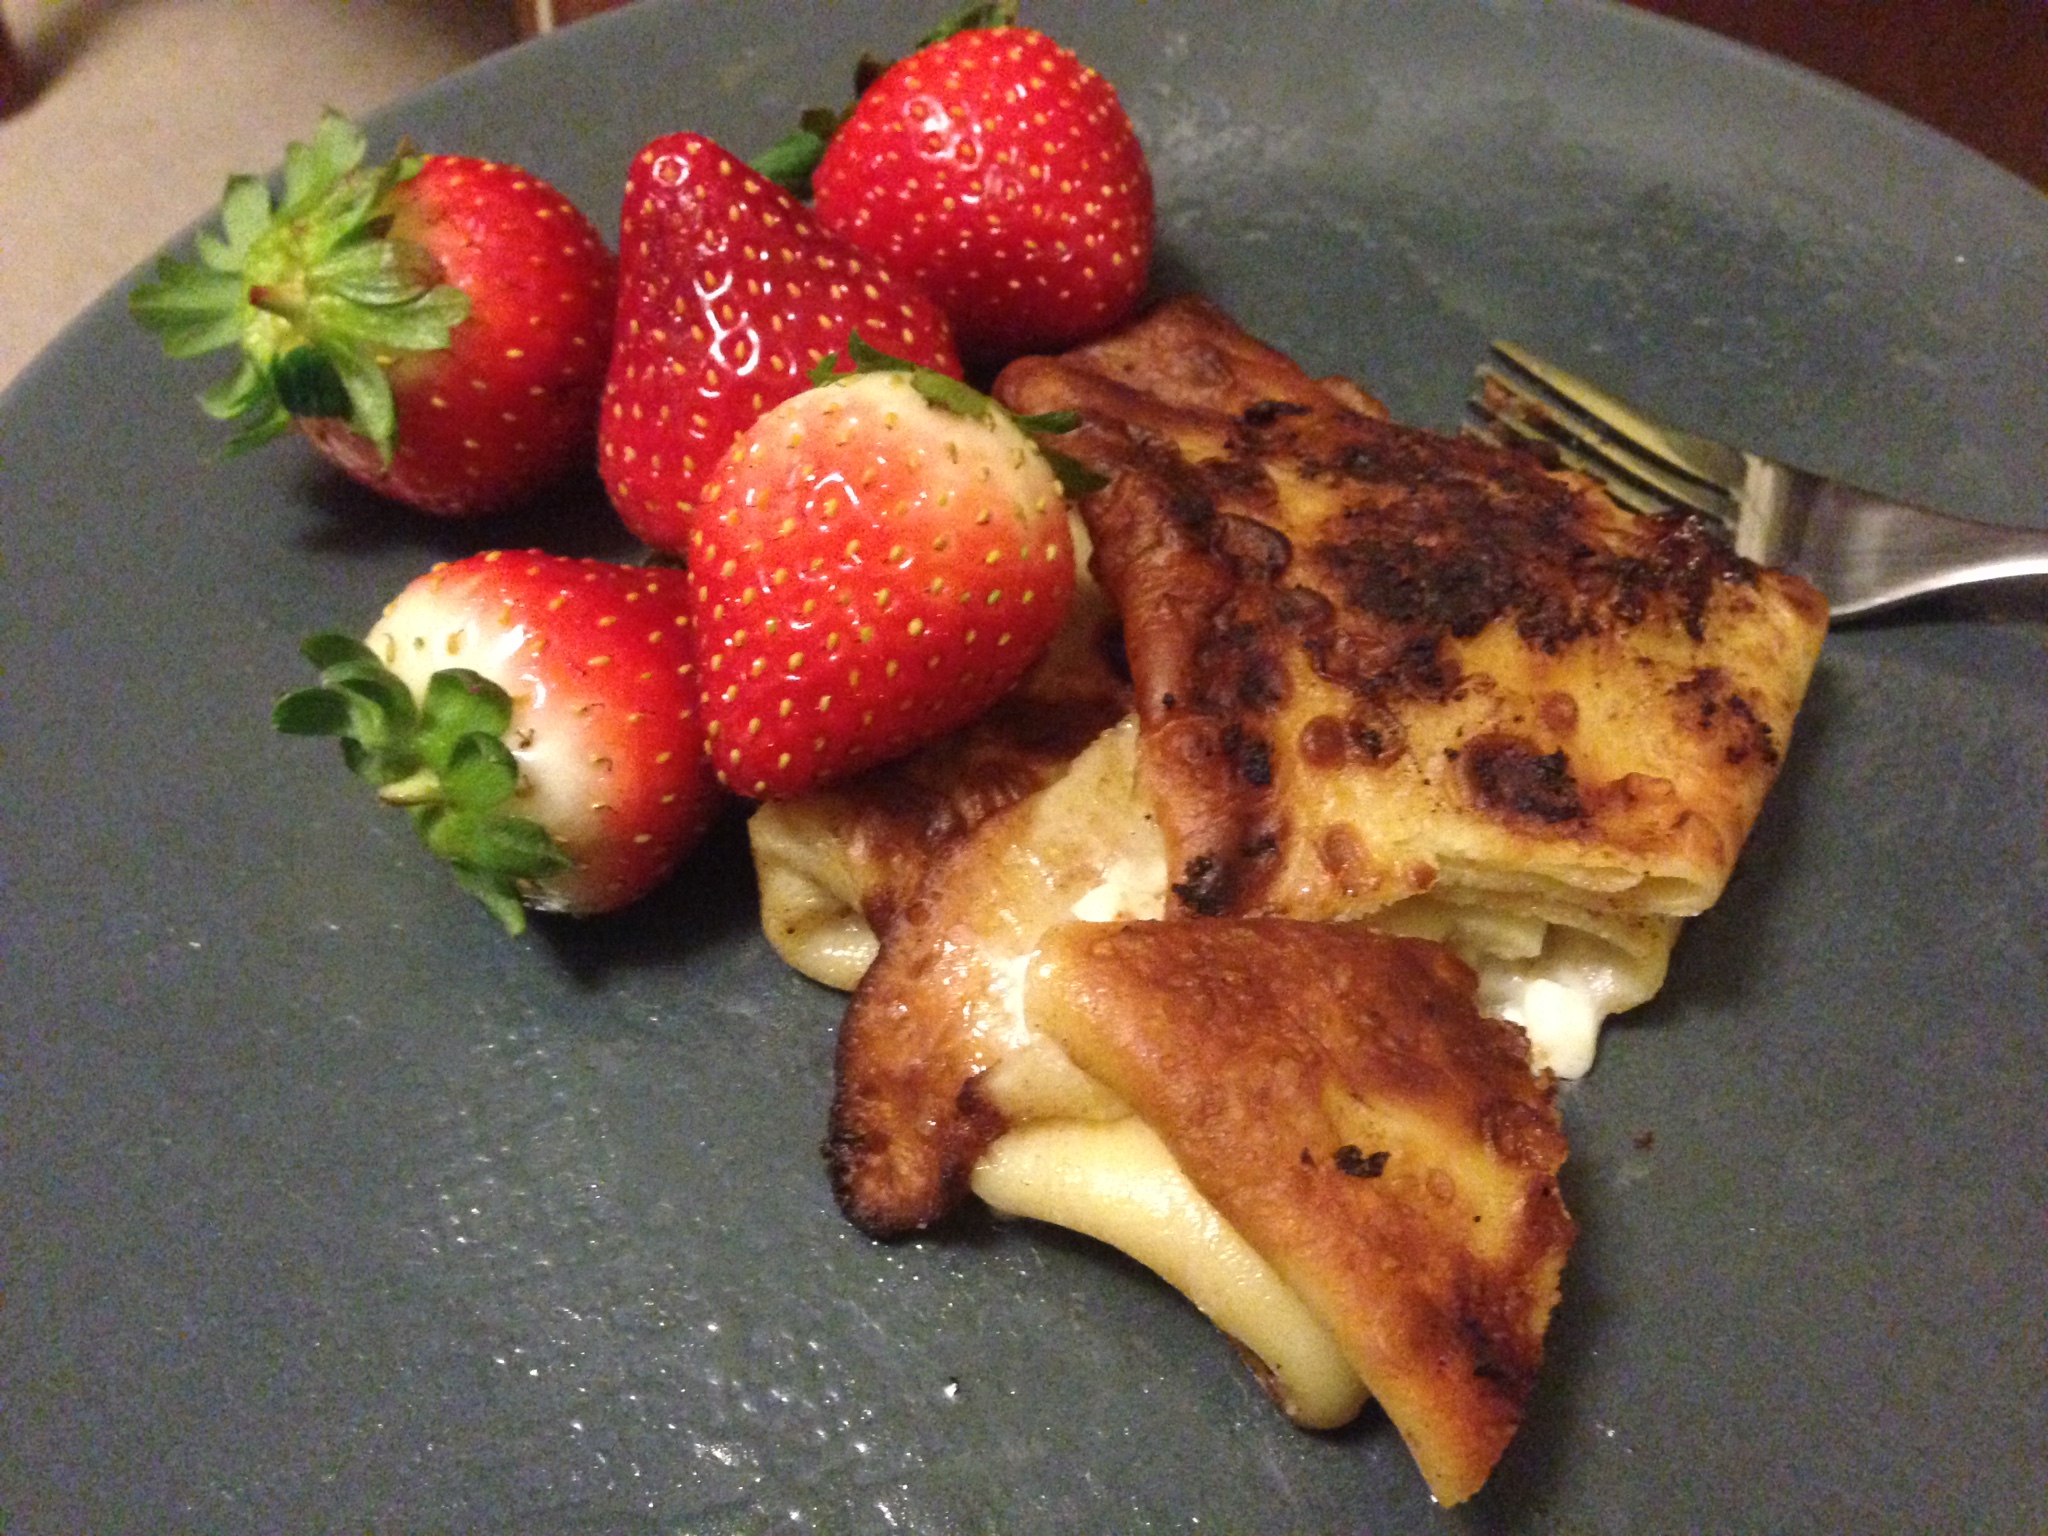
So, last year I made Nalysnyky* for Orthodox Ukranian Christmas**, based on an excellent (and very forgiving!) recipe provided by Tori Avery here:

Cheese Blintzes

I made a few changes to the recipe for various reasons, and I figured I’d copy it below.

Basically, Nalysnyky and Blintzes are some sort of filling wrapped in a crêpe. I chose cottage cheese*** instead of the Ricotta and Creme cheese suggested by the original recipe. My proportions may be a little different, as well. I feel like there’s something slightly missing in the filling, but I’m not sure what it is. They were still a hit at Christmas dinner last year and this year. (Last year, S and I made ourselves sick eating them, but they were oh so tasty. 😀 ) Both last year and this year, I made a double batch. IIRC, this makes 15-18 blintzes, more than enough to satisfy 7 and leave many left over for snacks.

This is a very forgiving recipe. You mix things in a bowl, the exact proportions don’t really matter, and you can pause partway through and nothing much will go wrong (assuming nothing is actively burning in your frying pan). The first time I made them, I had long pauses between steps (as it was my first time doing a new recipe in a long time), the second time, I only used a timer about 1/3 of the time, trusting in my ability to read butter cooking temperature (browns and crackles at 375 F), and how well done a crepe was.

Cooking utensils:
– Measuring cups
– Whisk and a lot of patience, or a blender or mixer capable of dispersing flour clumps from solution
– Frying pan (non-stick is better)
РPlates to store partially made cr̻pes
– Wax paper to put between crepes so that they do not stick to each other (essential if you’re saving time by only cooking one side of the crêpe to start
– Plates and paper towel to de-butter and store freshly cooked

Garnishes:
– Fruits, especially strawberries and raspberries
– Thawed blueberries, pineapple, and mango worked well today (just remember to thaw them completely)

Thinking about it, if you wanted to do this assembly-line style, you could have two frying pans on the go, one making the shells, one frying the results.

Crêpe shell ingredients:
– 4 eggs
– 1 cup flour
– 1/3 cup sugar
– 3/4 cup milk (I used lactose-free milk, for reasons)
– 1/4 cup water (I used H2O, for reasons)
– 1 tsp vanilla
– Pinch of salt

Cooking requirements
Р1-2 sticks of butter (I used two full sticks for a double batch. About 85% to cook the cr̻pes and the rest to fry the filled cr̻pes.)

You could also use whatever oil suits you. We used olive oil the first time we made them, to good effect.

Filling ingredients:
– 1 tub (500g) of cottage cheese (I used organic 2%)
– 1/4 cup sugar
– (Here, the original calls for an egg yolk. I’m not sure why. I left it out.)
– 1/2 lemon, mostly squeezed into the mix (original called for 2 tsp)
– 1 tsp vanilla (I put in a little extra****)
– Pinch of salt

1) Mix all the crêpe shell ingredients in a mixing bowl.
2) Stir these ingredients until no flour lumps remain. (I couldn’t get them all out, but they still ended up fine. You’ll get better consistency if you do this step more assiduously.)
3) While stirring, turn on your frying pan/skillet to 375F. (On our stove, this is 2.5 stops below half, but really, it’s wherever butter browns but doesn’t burn. I learned this from many years of making pancakes growing up, YMMV.)
4) Apply enough butter to the bottom of the frying pan/skillet to make a thin layer for cooking. You can tell by the fact that it is sizzling and slightly browning and coating the bottom of the pan.
5) Pour 1/3 cup of crêpe shell mix onto the frying pan/skillet, then add a bit more, perhaps up to 1/2 cup (this will make the shell slightly larger and easier to fit filling into
6) Wait 60-75 seconds (I set my microwave timer for 55***** seconds), or until the crêpe can be flipped without displacing uncooked liquid on its top (If you wish, you don’t need to cook both sides of the crêpe at this stage, you can cook the inside, add the filling, then cook the outside later, which may save you 15-30 mins, if you’re really organized).
7) While this is cooking, take a sheet of wax paper, and get it ready to receive the crêpe.
8) Flip the crêpe, and cook the other side for 60-75s.
9) Take the crêpe off the frying pan and place it on the holding plate and/or wax paper

10) Repeat steps 4-9 until all the crêpe batter is exhausted.

11) While you are cooking the crêpes, you can mix up the crêpe filling:
12) Stir the filling ingredients in a mixing bowl. You may want to add different amounts than above, to taste.

13) Put a small amount (one spoon’s worth) of the filling onto the lower middle of one of the crêpes. Fold the bottom part of the crepe over the middle, then each of the sides in, then fold the bottom ‘pocket’ up until the crêpe is rolled up like a burrito around the filling.

14) Melt about 1/3 of a stick of butter into the pan (this should be enough to cover the bottom of the pan…Add more if you want to brown more of the nalysnyky during frying).

15) 3 of the filled crêpes should fit in your pan. Cook for 1.5-2 minutes
16) Flip the filled crêpes, cook for another 1.5-2 minutes

17) Dry the excess butter onto a paper towel

18) Serve warm, with fruit, or whatever other garnish you wish!

*https://en.wikipedia.org/wiki/Nalysnyky

**https://en.wikipedia.org/wiki/Christmas#Choice_of_December_25_date

***It might have been this page, or another, which suggested the substitution: http://allrecipes.com/recipe/212387/cottage-cheese-blintzes/

****Or a little ‘extract’? 😀

*****I have a personal rule that I must press the fewest number of microwave number buttons whenever I program a countdown. This leads to interesting regions like 0:55, 0:66, 1:11, 0:77, where you get some nice overlap. Usually, though, it’s 0:33, 0:99, and 0:55.